
Protect Your SuiteCommerce Website from Fraudulent Bot Attacks
Bot attacks on SuiteCommerce websites can lead to significant financial losses through fraudulent transactions, excessive payment gateway requests, and disrupted customer experiences. In many cases, a large volume of malicious credit card attempts can trigger payment processor restrictions, preventing legitimate customers from completing purchases.
Implementing proactive bot protection measures is essential to safeguard your online store, maintain payment processing reliability, and ensure uninterrupted business operations. This solution follows industry best practices to help prevent automated bot activity, reduce fraudulent orders, and improve overall website security.
For businesses looking to further strengthen their SuiteCommerce security, additional solutions such as email verification can help validate customer registrations and guest checkouts, reducing the risk of fake accounts and unauthorized transactions.

Prerequisite: Create a Google reCAPTCHA Account
While you wait for access, you can begin by setting up your Google reCAPTCHA account and getting the keys needed for the installation.
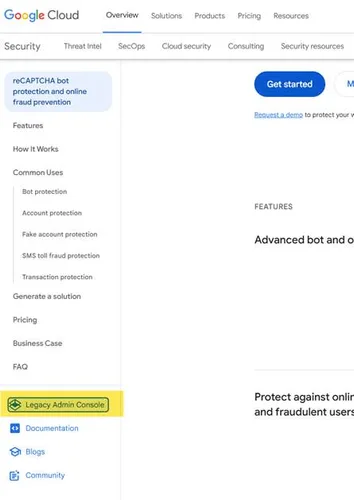
When you are there, you need to make sure you use the "Legacy Admin Console" before generating your keys.
You will need the following data pieces before setting up the bundle:
- Google captcha API URL
typically use https://www.google.com/recaptcha/api.js which appears by default
- Google verify captcha API URL
typically use https://www.google.com/recaptcha/api/siteverify which appears by default
- Google captcha site key
- Google captcha secret key
Compile this information in a safe location while you wait for access to the bundle. Access requests received before 12 PM CST typically will be available within the same day. Otherwise, receiving access to the bundle might take a full business day.
When you are on the website, you can select this link, which will take you to the page to set up a V2 reCAPTCHA (the version currently supported by the bundle).

Then, you can create your account. Select "reCAPTCHA v2" and the "I'm not a robot" selection. Fill in the rest of the information as required.
Troubleshooting Hint: Make sure to include your SuiteCommerce checkout domain as well if you don't use your primary domain with your checkout domain.
NOTE: If you plan to use V3, please select the V3 option instead.
After you click "Submit," you will be taken to this page, which shows you the two fields you need to collect for the SuiteCommerce configuration at a later step.
Step 1: Install the Bundle
The first step is to install the bundle in your NetSuite account. To complete this task, you must have NetSuite Administrator privileges or the necessary permissions to install bundles.
If you do not have the required access, contact your NetSuite Administrator and request that they either install the bundle on your behalf or grant you the appropriate permissions.
To begin the installation:
Log in to your NetSuite account.
Navigate to Customization > SuiteBundler > Search & Install Bundles.
Locate the bundle using the provided Bundle ID or bundle name.
Follow the installation prompts to add the bundle to your NetSuite environment.
Once the installation is complete, you can proceed with the configuration and setup steps.
Step 2: Activate the Extension
The next step is to activate the extension for the SuiteCommerce website. Navigate to Commerce > Extensions > Extension Manager.
Click "EDIT" on the domain you want to activate this extension on and then navigate to the "Extensions" tab. Once you are there, you will need to "Check" the "Google Re-CAPTCHA Integration" extension and then click "ACTIVATE."
Refresh the page several times until you see that the activation has finished its progress and is completed.
Step 3: Recaptcha Configuration
For security reasons, Anchor Group placed the Google ReCaptcha keys outside the SuiteCommerce configuration record. This means that there is a record just for these keys to be configured prior to checking the boxes for where you want them displayed on the website.
Troubleshooting Tip: If you are using a customized customer center role, then can add the custom record to the permission list for AG Recaptcha Configuration.
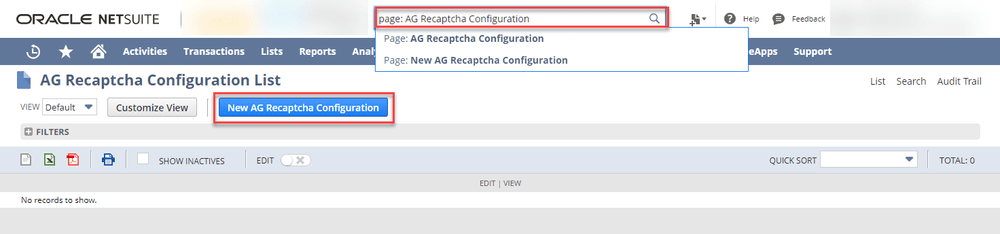
In the global search bar, search for "Page: AG Recaptcha Configuration", then click "New AG Recaptcha Configuration."
This is where you will place the keys you captured during the prerequisite step of these instructions.
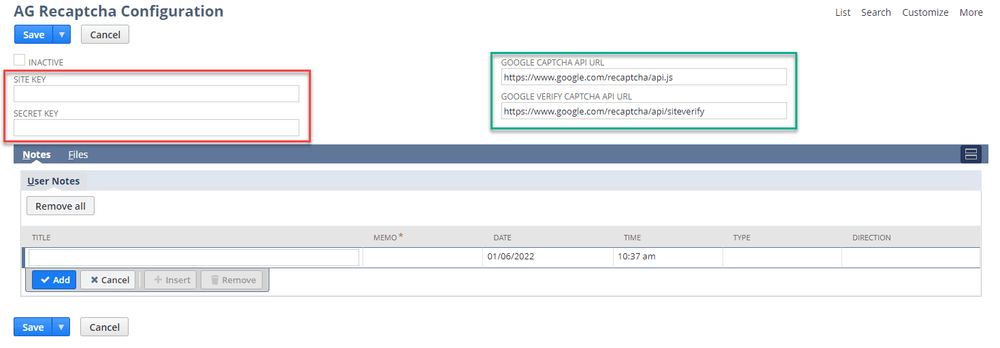
Copy/paste your site key and secret key, which you found during the prerequisite step of this process, into the appropriate fields.
NOTE: If you see the checkbox called "Subscription," then enable that checkbox.
IMPORTANT: DO NOT DELETE the configuration record as if you delete the initial record and create a new one as the internal ID is directly connected to the extension, it will create an error and you will need to reach out to Anchor Group for support.
Step 4: SuiteCommerce Configuration
Navigate to the SuiteCommerce configuration to complete the Google reCAPTCHA configuration for your website.
COMMERCE > WEBSITES > CONFIGURATION
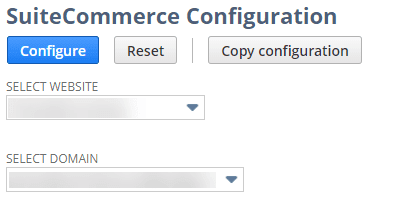
Select your website record and domain for your SuiteCommerce website and click "configure".
Then, you will need to navigate to the "Extensions" tab and then the "Google Captcha Integration" subtab.
Enter the Site Key and Secret Key from your Google reCAPTCHA account and select the checkboxes where you want the reCAPTCHA to display.
Once you have finished this configuration, you can click "Save".
Step 5: Testing and Validation
After completing the configuration, perform a Cache Invalidation Request to ensure all updates are applied across your SuiteCommerce website.
Once the cache invalidation process is complete:
Open your SuiteCommerce storefront.
Refresh your browser cache by pressing Ctrl + Shift + R (Windows) or Cmd + Shift + R (Mac).
Verify that the Google reCAPTCHA widget appears in all the locations you configured.
Carefully review the user experience to ensure the reCAPTCHA is displayed correctly and functions as expected. If the widget does not appear or behaves unexpectedly, it may be due to conflicts with existing SuiteCommerce customizations, themes, or third-party extensions.
If needed, you can temporarily disable the functionality by:
Removing the relevant display settings within the extension configuration, or
Disabling the extension through the Extension Manager and reactivating the site.
After confirming the reCAPTCHA placement, test each enabled area of your storefront and complete a sample transaction to verify proper functionality.
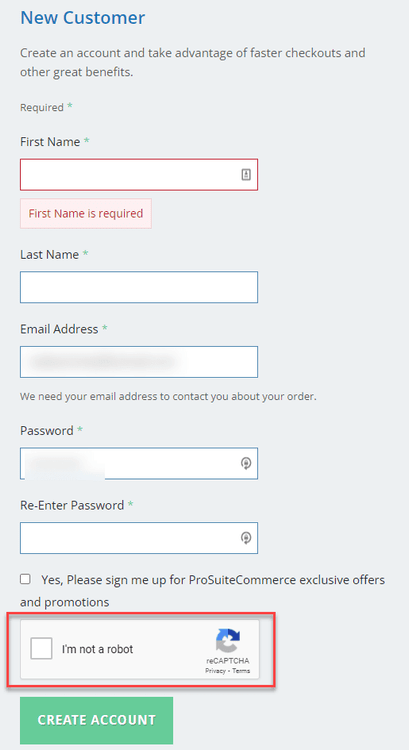
Test New Customer Registration
If reCAPTCHA has been enabled for customer registration, perform a full registration test to ensure users can successfully create new accounts without errors.
During testing, verify that:
The reCAPTCHA challenge loads correctly.
New customer registration is completed successfully.
Confirmation emails and account creation processes work as expected.
No validation or internal system errors occur during registration.
If reCAPTCHA is also enabled during checkout, place a test order using the newly created customer account to confirm the entire purchasing process functions correctly from registration through order completion.
Test Order Placement
If Google reCAPTCHA is enabled for checkout or order placement, test the functionality by signing in as a returning customer and placing a sample order. This confirms that reCAPTCHA is triggering correctly during the checkout process and does not block legitimate transactions.
Test Guest Checkout
If reCAPTCHA is enabled for guest checkout, you should also verify the guest checkout flow.
To test guest checkout:
Add an item to the cart while not logged into the website.
Proceed to checkout until the guest checkout option appears.
Continue as a guest customer and complete a test order.
Important: The “Display reCAPTCHA for Registration” option must be enabled for guest checkout to function properly.
Getting an Internal Error?
If you encounter an internal error during testing, verify that your SSP applications are using SuiteScript 2.0. Older SuiteCommerce implementations, especially those created before 2021, may still be using an earlier scripting version.
You can update this setting by following the instructions in the relevant NetSuite SuiteAnswers documentation for enabling SuiteScript 2.0 on SSP applications.
Troubleshooting Tips
If reCAPTCHA is not working as expected, check the following:
Ensure your custom Customer Center role has permission to access the reCAPTCHA custom record.
Confirm that SuiteScript 2.0 is enabled for your SSP application and associated with the correct domain.
Verify that there are no extra spaces before or after the reCAPTCHA Site Key and Secret Key copied from the Google reCAPTCHA Admin Console.
Make sure the extension has been fully activated in the Extension Manager.
Confirm that the correct and current bundle ID was installed.