Connecting Microsoft Power BI to NetSuite Analytics Warehouse (NSAW) lets you combine the power of Microsoft’s modern analytics platform with the rich, historical ERP data stored in your NSAW database. Whether you want unified reporting across finance and operations or interactive dashboards for leadership, this integration unlocks deeper insights for your business.
Before diving into the steps, it’s worth noting that Power BIis just one option for analytics. NSAW itself supports powerful visual reporting, but connecting to Power BI gives you flexibility if that’s your organization’s preferred BI tool.
Why Connect Power BI to NSAW?
Enhanced visualization & flexibility: Build rich interactive dashboards with Power BI visuals.
Better cross-system analytics: Combine NSAW data with other sources (CRM, marketing, etc.).
Historical & custom analysis: Use SQL queries and refresh schedules not possible in native NSAW dashboards.
Preparation Checklist
Before connecting Power BI to NSAW:
You must have access to your NSAW Autonomous Data Warehouse (ADB) instance.
Download your NSAW wallet credentials (credentials ZIP with tnsnames.ora, sqlnet.ora).
Use a Windows system where you’ll install the required Oracle tools.
s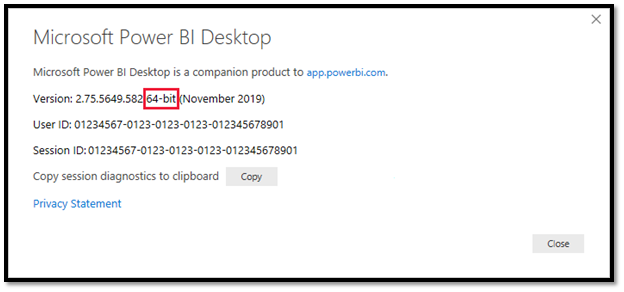
Step-By-Step Guide
1. Download Required Credentials
From your NSAW console, download the Cloud Wallet ZIP.
Extract it to a folder (e.g., C:\nsaw_wallet).
This contains your SSL certificates, network configuration, and TNS alias.
These files authenticate and secure the connection between Power BI and NSAW.
2. Install Oracle Client Tools
Power BI needs the Oracle client installed to connect to NSAW:
Download and install the Oracle Client for Microsoft tools (OCMT) (64-bit).
Also, install the Oracle Instant Client and unzip it in a folder (e.g., C:\oracle\instantclient).
This allows Power BI to communicate with the Oracle database behind NSAW.
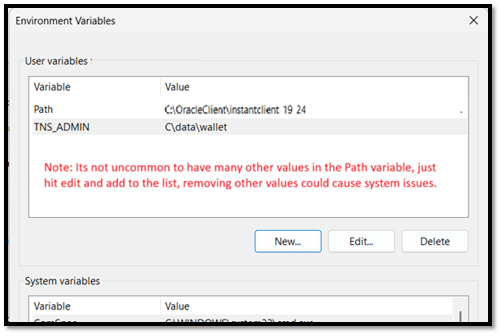
3. Set Your Windows Environment Variables
To ensure Power BI uses the wallet files correctly:
Open System Environment Variables
Set TNS_ADMIN to your wallet folder (e.g., C:\nsaw_wallet)
Add the Oracle Instant Client path to your PATH variable
These settings let the Oracle drivers locate your NSAW connection credentials.
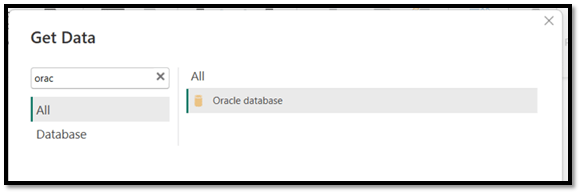
4. Connect from Power BI Desktop
Now you’re ready to connect:
Open Power BI Desktop
Go to Home > Get Data > Oracle Database
In the pop-up dialog:
Server: Enter the TNS alias from your wallet’s tnsnames.ora (e.g., oax123456_high)
Data connectivity mode: Choose either Import (cached) or DirectQuery (live).
Click OK
Enter your database credentials when prompted
Once connected, you’ll see available tables and views from NSAW, and select the ones you need.
5. Build & Refresh Reports
With your datasets loaded, you can:
Create visual reports, charts, and dashboards
Blend NSAW data with other sources (e.g., CRM or external systems)
Use Power BI’s scheduling tools to refresh data regularly
Direct Query mode lets you work against live data, while Import lets you cache and optimize for performance.
Why This Matters
By connecting Power BI to NSAW, you combine one of the world’s leading analytics platforms with a powerful warehouse that already collects your ERP data. This empowers users across finance, operations, and leadership with the insights they need without manual exports or disconnected data silos.