How to Connect NetSuite to SQL Server Using SuiteAnalytics Connect
NetSuite holds your transactional data sales orders, customers, invoices, inventory. SQL Server is where most organisations do their serious data work. Connecting the two means you can query live NetSuite data directly from SQL Server Management Studio without exporting a single CSV. Here is exactly how to set it up from scratch.
Why Connect NetSuite to SQL Server?
NetSuite's built-in reports are useful but limited. You cannot easily join NetSuite data with data from other systems, write complex multi-table queries, or build automated pipelines that pull fresh data on a schedule. Every time you need a custom report, someone has to log into NetSuite, build a saved search or report, export it, and pass it along.
Once NetSuite is connected to SQL Server via SuiteAnalytics Connect, all of that changes. You can query NetSuite tables directly using standard SQL, join NetSuite customer data with your own tables, build stored procedures that refresh automatically, and feed the results into Power BI, Excel, or any other tool that can read from SQL Server. It is a one-time setup that permanently improves how your organisation accesses NetSuite data.
How it works in plain English
SuiteAnalytics Connect is NetSuite's built-in ODBC interface. It exposes your NetSuite data as a set of SQL-queryable tables. The ODBC driver sits on your Windows machine and acts as the bridge. SQL Server's Linked Server feature then wraps that ODBC connection so you can query NetSuite using standard SQL from inside SSMS just like querying any other database.
Prerequisites
Make sure you have all of these before starting. Missing any one of them will block you at a specific step.
- NetSuite Account : With SuiteAnalytics Connect access enabled
- NetSuite Permissions : Administrator or role with Analytics access
- Windows Machine : The ODBC driver is Windows-only
- SuiteAnalytics Connect ODBC Driver : Downloaded from NetSuite
- SQL Server : Express edition is free and sufficient
- SQL Server Management Studio : Free download from Microsoft
- Internet Connectivity : Required for the ODBC connection to NetSuite
The Step-by-Step Connection Process
Step 1 : Enable SuiteAnalytics Connect in NetSuite
Before anything else, SuiteAnalytics Connect needs to be enabled in your NetSuite account. This is done through the Company Features settings.
- Log into NetSuite and go to Setup → Company → Enable Features
- Click the Analytics subtab
- Find SuiteAnalytics Connect and check the box to enable it
- Click Save
If you do not see the Analytics subtab or the SuiteAnalytics Connect option, your NetSuite role does not have the required permission. Ask your NetSuite administrator to enable it or assign you a role that includes SuiteAnalytics access.

Step 2 : Get Your SuiteAnalytics Connect Details
After enabling SuiteAnalytics Connect, you need to find your connection credentials. These are specific to your NetSuite account and are different from your login credentials.
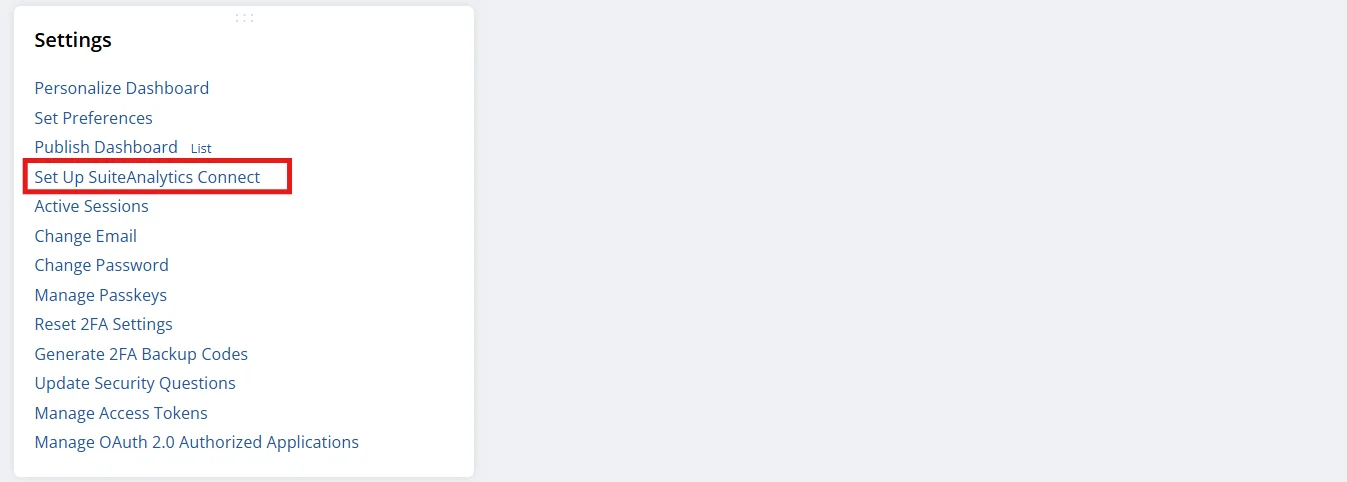
- Go to Home → Settings
- Click Set Up SuiteAnalytics Connect
- Note down all the values on this page you will need them in Step 4
Keep these details secure
Your Account ID, Role ID, Service Host, and credentials are sensitive. Do not paste them into shared documents or screenshots without redacting them first.
Step 3 : Download the SuiteAnalytics Connect ODBC Driver
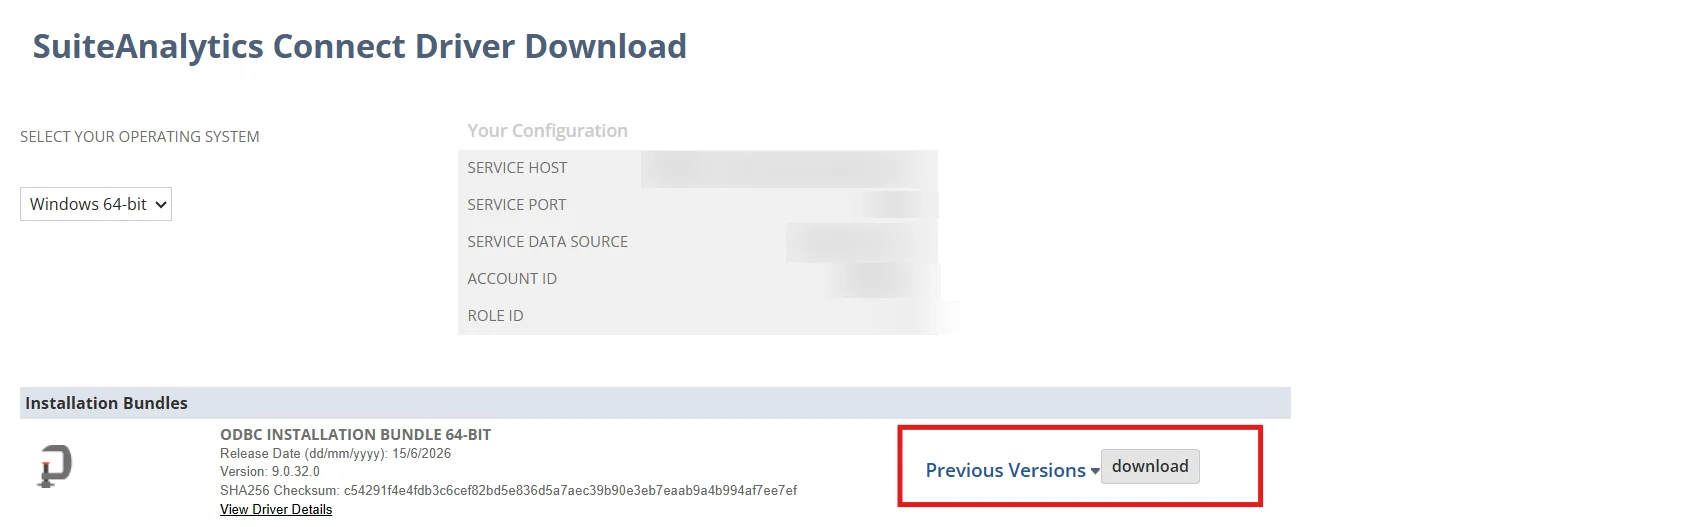
The ODBC driver is also available from the SuiteAnalytics Connect setup page in NetSuite.
- On the Set Up SuiteAnalytics Connect page, find the driver download section
- Download the Windows 64-bit ODBC driver
- Run the installer and follow the installation steps
- Once installed, the driver will be available as an option in Windows ODBC Data Source Administrator
Download the 64-bit version
SQL Server on modern Windows is 64-bit. The ODBC driver must match download the 64-bit version. The 32-bit driver will install without errors but SQL Server will not be able to see it.
Step 4 : Configure the System DSN in Windows ODBC
A System DSN (Data Source Name) is a saved connection profile that SQL Server will use to connect to NetSuite. Setting this up correctly is the most important part of the whole process.
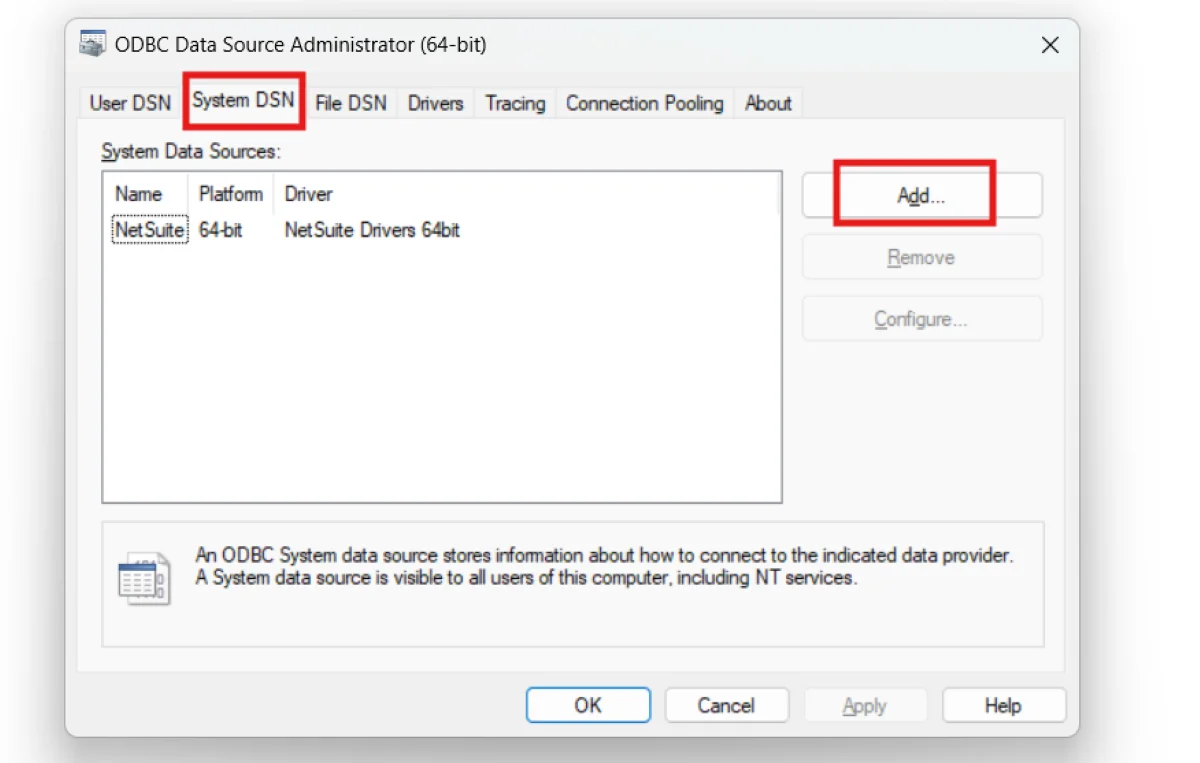
- Press Windows + S and search for ODBC Data Sources (64-bit) make sure you open the 64-bit version
- Click the System DSN tab
- Click Add
- Select NetSuite Driver 64 Bit from the list and click Finish
- Fill in the configuration fields using the values from Step 2
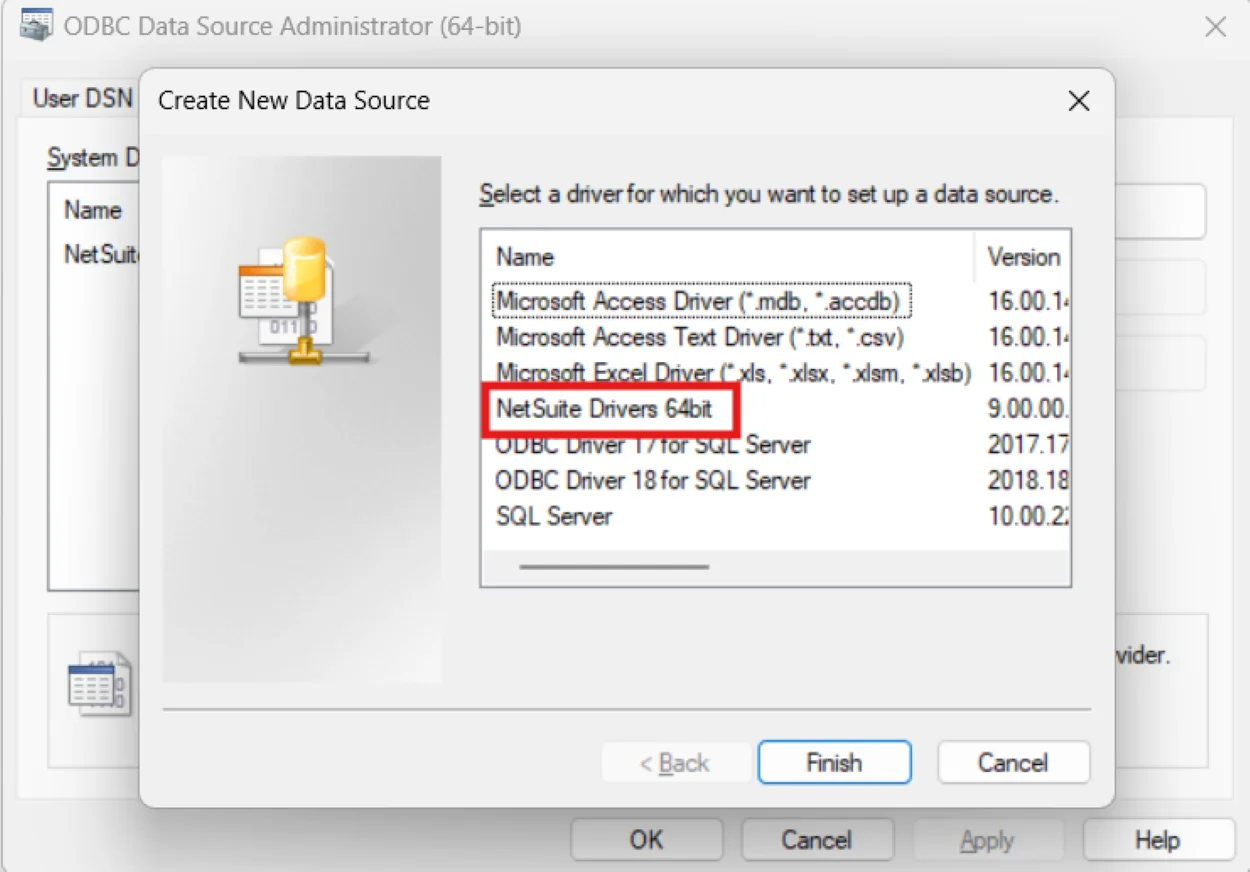
Use System DSN, not User DSN
SQL Server's Linked Server feature runs under the SQL Server service account, not your Windows user account. A User DSN is only visible to your user SQL Server will not find it. Always create a System DSN for server-to-server connections.
Step 5 : Test the ODBC Connection
Before moving to SQL Server, confirm the ODBC connection itself is working. This saves a lot of time debugging later.
- In the ODBC configuration window, click Test Connection
- Enter your NetSuite username and password when prompted
- If successful, you will see a Connection successful message
- Click OK to save the DSN
If the test fails
Double-check the Service Host URL it is the most common source of errors. Make sure there is no trailing slash and the format exactly matches what NetSuite shows on the setup page.
Step 6 : Install SQL Server and SSMS
If you do not already have SQL Server and SSMS installed, here is how to get them. Both are free for this use case.
Install SQL Server Express
- Go to microsoft.com/en-us/sql-server/sql-server-downloads
- Download SQL Server Express the free edition
- Run the installer and choose Basic installation type
Install SQL Server Management Studio (SSMS)
- Go to learn.microsoft.com/en-us/ssms/download-sql-server-management-studio-ssms
- Download and install SSMS it is a free graphical tool for SQL Server
- Open SSMS after installation
- In the Connect to Server dialog, enter your System name in the Server name field:
YOUR_SYSTEM_NAME\SQLEXPRESS - Set Authentication to Windows Authentication and click Connect
Step 7 : Create a Linked Server in SSMS
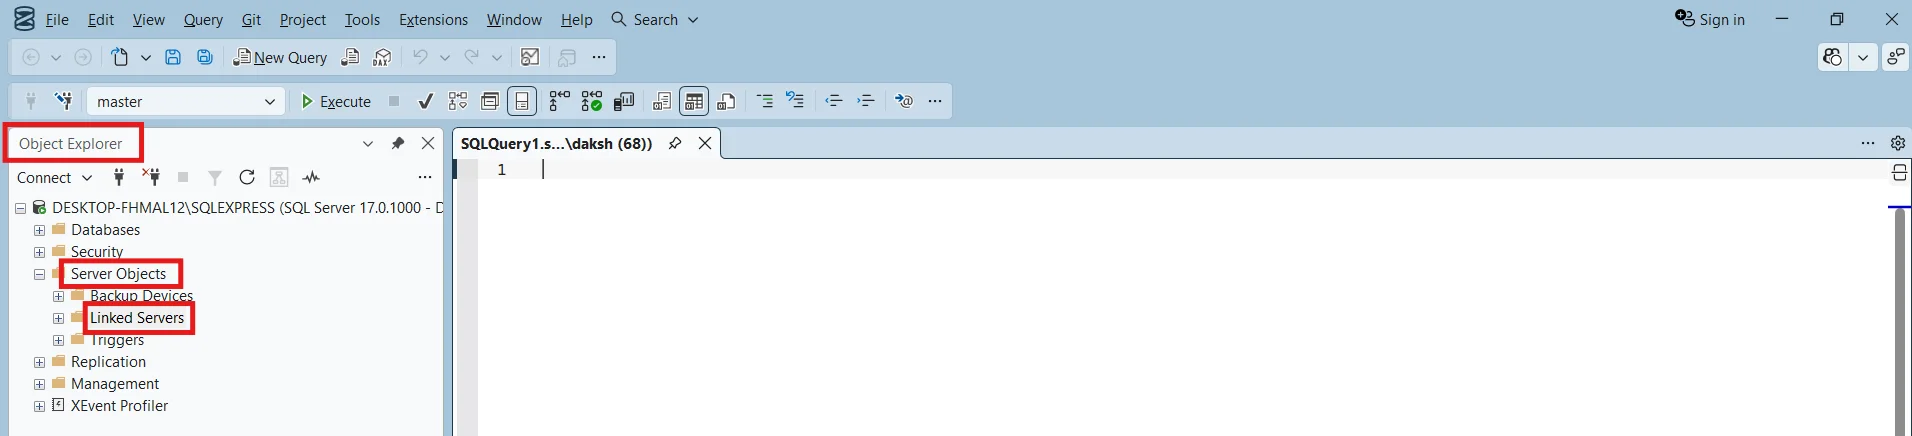
A Linked Server tells SQL Server about the NetSuite connection so you can query it using standard SQL. Navigate to it in SSMS like this:
Navigation path in SSMS Object Explorer
Object Explorer └── Server Objects └── Linked Servers ← Right-click here → New Linked Server...
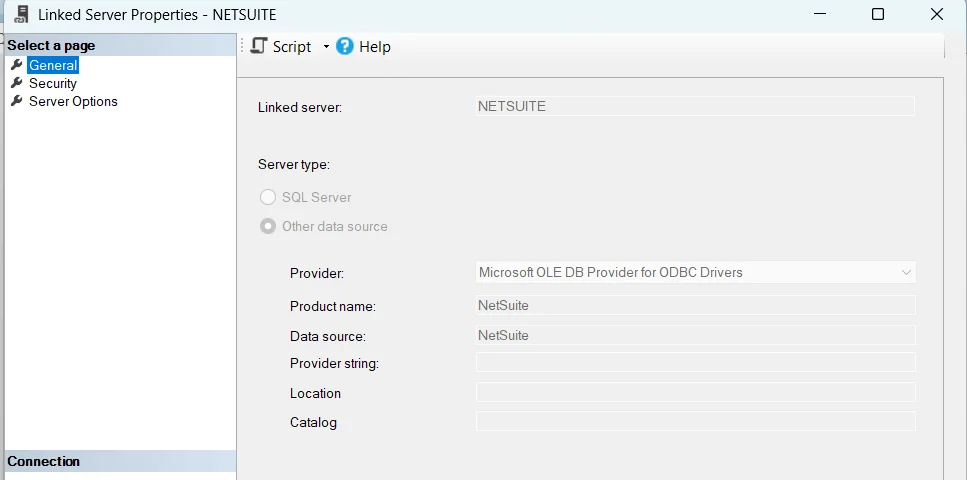
In the New Linked Server window, fill in the General tab with these exact values:
| Field | Value |
|---|---|
| Linked server | NETSUITE |
| Server type | Other data source |
| Provider | Microsoft OLE DB Provider for ODBC Drivers |
| Product name | NetSuite |
| Data source | NetSuite |
Step 8 : Configure Linked Server Security
Click the Security tab in the New Linked Server window. This is where you tell SQL Server which credentials to use when connecting to NetSuite through the ODBC driver.
- Select Be made using this security context
- In the Remote login field, enter your NetSuite username
- In the With password field, enter your NetSuite password
- Click OK to create the Linked Server
These are NetSuite credentials not Windows credentials Enter the username and password you use to log into NetSuite. Do not enter your Windows login. Do not share screenshots of this screen with the password visible.
Use a dedicated service account Rather than using your personal NetSuite login, ask your NetSuite admin to create a dedicated service account with only the permissions needed for reporting. This way, rotating your personal password will not break the SQL Server connection.
Step 9 : Query NetSuite from SQL Server
Once the Linked Server is created, you can query NetSuite data directly from SSMS using SQL Server's OPENQUERY() function. Open a new query window in SSMS and try this:
Basic test query list customers from NetSuite
SELECT *
FROM OPENQUERY(
    NETSUITE,
    'SELECT id, entityid, companyname
     FROM customer'
);
Here, NETSUITE is the Linked Server name you created. The query inside the single quotes is passed directly to NetSuite through the ODBC connection. NetSuite executes it against its own data and returns the results to SQL Server.
Troubleshooting Common Problems
- Cannot create System DSN NetSuite driver not in the list : The ODBC driver was not installed correctly or you are opening the wrong ODBC administrator. Make sure you downloaded and installed the 64-bit driver and are opening ODBC Data Sources (64-bit), not the 32-bit version. Search specifically for "ODBC Data Sources (64-bit)" in Windows search.
- SuiteAnalytics Connect option not visible in NetSuite : Your NetSuite subscription may not include SuiteAnalytics Connect, or your role does not have permission to see it. Contact your NetSuite account manager to confirm it is included in your licence. If it is included, ask your NetSuite administrator to enable it under Setup → Company → Enable Features → Analytics.
- OPENQUERY returns "Login failed for user" : The credentials in the Linked Server Security tab are wrong. Go to Linked Servers → right-click NETSUITE → Properties → Security tab. Re-enter the NetSuite username and password. Confirm they work by testing the ODBC connection directly in ODBC Administrator with the same credentials.