
A client was attempting to commence an inventory transfer from their primary warehouse to another site. However, at the line-item level, none of the controls in NetSuite, like “Add,” were operational, preventing the form from being completed.
Issue: Inventory Item Availability Status
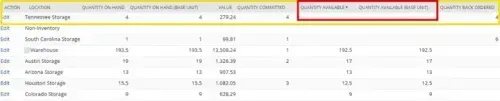
The issue arose from the inventory item's availability status at the receiving location (in this case, the Tennessee storage facility). Reviewing the item record in NetSuite revealed that while 4 units of the items were in stock, none were marked as available, a necessary condition for a typical inventory transfer.
Thus, the low inventory of the item at the Tennessee storage facility (prompting the desire to transfer stock in the first place), coupled with the unavailable items, is the reason hindering the standard inventory transfer from being executed in NetSuite.
Restock Location Through NetSuite Inventory Transfer Function
A potential solution lies within the “Replenish Location via Inventory Transfer” function in NetSuite. This form highlights low-inventory items near their restock point from which you can make selections. It also provides suggestions for replenishment quantities.
![]()
Successful Inventory Transfer Example in NetSuite
After submitting the inventory details (note that it treats the locations similarly to bins), this functions as a conventional inventory transfer.

Here is an example of a successful inventory transfer submission utilizing the “Replenish Location via Inventory Transfer” function.
![]()
Encountered a Step You Can’t Complete?
We regularly update our blogs and articles to ensure they effectively address any troubleshooting issues you may face. There might be an associated feature to activate or a field left unfilled that we overlooked in the instructions. If this article did not solve the problem, please reach out via chat so we can enhance the content!