In my previous post, I gave an overview of containerization and briefly mentioned the types of containers I’m familiar with. I initially planned to discuss Docker next, but curiosity led me down a different path to explore the “dark side” of containerization: Linux Containers (LXC), pronounced Lex see.
In this article, we’ll take a closer look at LXC/LXD, understand what makes them unique, and walk through how you can install them on your local system.
Would you like me to continue rewriting the rest of your article (including a step‑by‑step installation guide) in the same style?
Understanding LXC and LXD: Lightweight Virtualization Explained
LXC (Linux Containers) are lightweight, self-contained environments that emulate an isolated system. Each container has its own dedicated CPU, memory, storage, and network resources, yet all share the same Linux kernel as the host operating system. This architecture makes LXC highly efficient, since there’s no need to run a separate kernel for each container, as in traditional virtual machines.
LXD (Linux Daemon) pronounced Lex Dee, is a higher-level system container manager built on top of LXC. It enhances the LXC experience by introducing advanced management features, a user-friendly interface, and network-based control. Internally, LXD relies on LXC through liblxc and its Go bindings to create and manage containers. Essentially, LXD provides a modern alternative to the traditional LXC toolset, adding support for remote container management and image distribution.
At its core, LXD exposes a REST API that operates over a local Unix socket or a network connection (if permitted). Every action from launching a container to configuring a network,s is executed through this API. LXD’s accompanying command line client communicates with this REST API for all container operations, offering a simplified and efficient administrative experience.
Unlike Docker, which packages and runs individual applications inside lightweight containers, LXD focuses on system containers. It manages full operating system environments using base user images rather than bundling applications into isolated file systems. Think of Docker as centered around application level containers, while LXD manages machine-level containers more like lightweight virtual machines.
You can learn more about LXD and its capabilities on the official LXD introduction page.
Step 1: Update and Upgrade Your Package Repository
Before installing, make sure your package lists are up to date and that all existing packages are upgraded. Run the following command in your terminal:
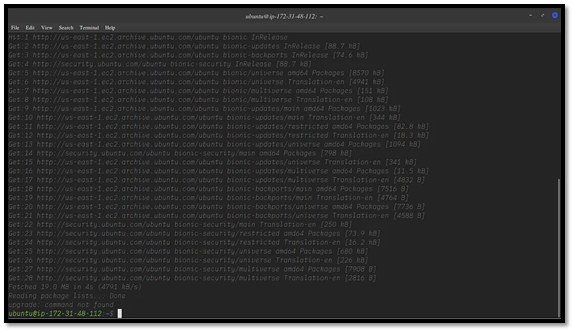
This updates the package information from all configured sources and ensures that your system is current. Once complete, your terminal should display a confirmation similar to the sample output above.
Step 2: Install LXD
When the repository update is done, install LXD using:
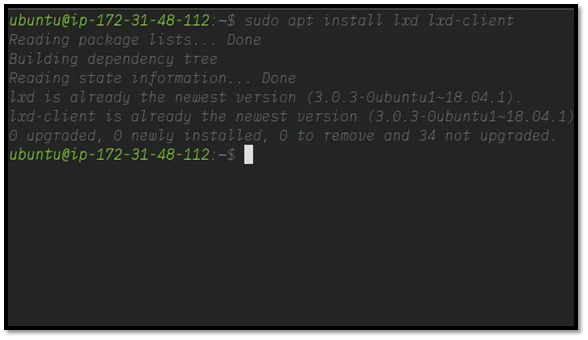
At the time of this setup, version 3.0.3 was the latest stable release.
If you encounter a permissions error, run the same command with superuser privileges using:
This executes your previous command with administrative rights.
Step 3: Understanding the Installation Components
The lxd package contains everything required for your machine to accept API calls, while the lxd client (Linux client) is responsible for making those API requests to the LXD daemon.
If everything installs correctly, you’ll see confirmation that both the application and dependencies are set up. Some Linux distributions ship with lxd and lxd client preinstalled, in which case your terminal output will indicate that the latest versions are already present.

Understanding and Configuring LXD: Key Terms Explained
Before diving into LXD setup, it’s helpful to understand what each configuration option means. This breakdown covers the major settings you’ll encounter during initialization and how you can configure them based on your needs.
LXD Clustering
LXD clustering allows multiple LXD servers to function as a unified environment. When clustering is enabled, all servers share the same distributed database, and you can manage them collectively using the lxc client or the REST API.
In my case:
I used my default IP as the identifier for the cluster node (your setup may differ).
I allowed my default IP to be used for communication between cluster nodes.
Since I didn’t have an existing cluster, I selected the default option.
Normally, you should enable password authentication for your cluster for added security. For this demonstration, I set password authentication to no, even though the default is yes.
Storage Pool
The storage pool created during lxd init serves as the default location for container data such as images, snapshots, and instances. Think of it as your container’s dedicated storage area.
You can explore more about storage pools and available backends in the LXD storage documentation.
In my setup:
I chose Btrfs as my storage backend because it provides advanced features, like separating user data from system installations without requiring separate partitions.
You can choose from multiple variants based on your system and preferences.
Since I didn’t have an existing block device, I chose the default option (no).
I allocated 12GB for the pool, as my base image is around 40GB.
If you have a remote storage backend available, you can configure LXD to use it as well.
MAAS Server
Integrating MAAS (Metal as a Service) with LXD is a solid option if you want to test MAAS or use it in combination with container-based architecture policies. This setup allows for flexible and lightweight infrastructure testing.
Network Bridge
LXD supports three main network connection types:
Bridge (default): Creates an L2 bridge that connects all instances to a common network. It can also provide local DHCP and DNS services.
Macvlan: Allows instances to connect directly to the parent’s physical interface. It’s ideal for network segmentation and enhanced isolation.
SR IOV: Used to connect instances to a parent Single Root I/O Virtualization (SR IOV) interface for hardware-level performance.
In most setups, the bridge configuration is recommended for its simplicity and built-in connectivity features.
Fan Overlay Network
The Fan overlay network enables extensive scaling of container address space. Essentially, it allows you to multiply your available container IP addresses by up to 250 times per host, making it invaluable for large-scale environments.
By deploying a fan network, administrators can manage significantly more containers within a single environment without IP conflicts.
Cached Image
LXD follows an image-based workflow. It includes an internal image store that allows users or third-party tools to import and manage container images.
Images can be:
Pulled remotely from public sources, or
Spawned locally from cached copies.
When you launch an instance using a remote image, LXD automatically caches it on the target host. This means that the same image won’t be downloaded again, improving deployment speed and reducing bandwidth usage.
Review Configuration Summary
After defining your preferences, LXD displays the full set of configuration details in YAML format before applying them. This summary lets you review (and optionally export) your chosen settings for documentation or reproducibility.
Next Step: Launching an Instance
Once your configurations are confirmed, you can launch your first container instance using the lxc launch command.
Command format:
Example:
This initializes a new container based on the specified image, applying all the configuration settings you just defined. 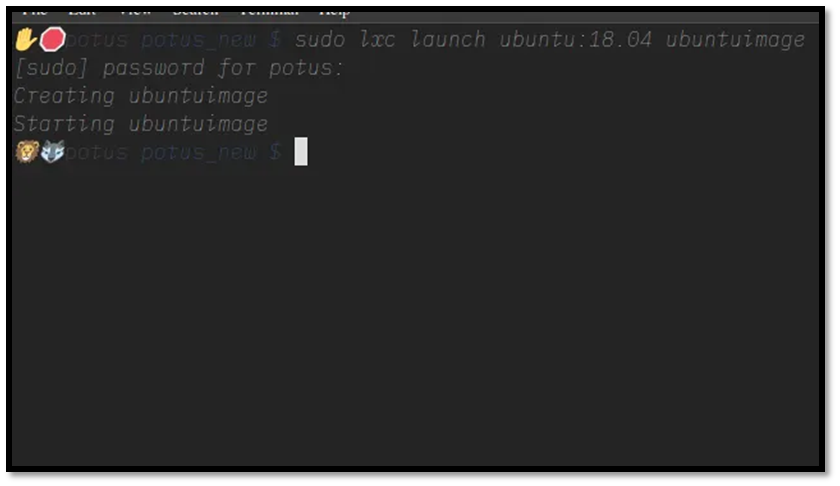
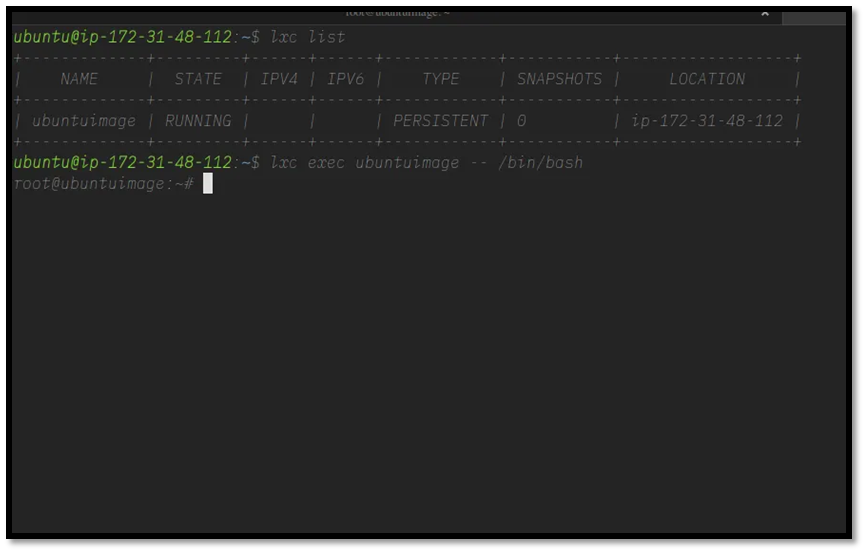
Listing and Accessing LXC Instances on Ubuntu
After setting up LXC and launching a new container, you can list all active or stopped instances using the following command:
This command displays a table of running instances along with their status, IP addresses, and configuration details.
Logging into the Newly Created Instance
Since we launched an Ubuntu image, we’ll be using bash as our command interpreter. The general syntax for accessing an instance’s shell is:
For example, if your instance is named ubuntu test, the command would look like this:
Running this command logs you directly into the instance with root privileges. Once connected, you’ll be in the root shell of your containerized environment and can begin executing administrative or setup tasks.
Example output:
At this point, you’re effectively working inside your isolated LXD container with all the benefits of a lightweight virtualized environment.
Stopping and Deleting LXC Instances
If you ever need to remove an instance, LXD enforces a safe two-step process to prevent accidental data loss. You must first stop the container and then delete it.
Use these commands:
lxc delete <instance name>
This ensures that an active instance is properly shut down before removal.
Additional Notes
The installation and commands referenced here were tested on a server running Ubuntu.
LXD is API driven, which means you can manage instances programmatically through REST API calls. This is especially useful for automation workflows.
For enthusiasts working with OpenStack, note that Nova LXC integrates with OpenStack and LXD, making it possible to manage lightweight containers as part of your OpenStack infrastructure.
Final Thoughts
Congratulations! You’ve successfully created, accessed, and managed your first LXC instance. In the next post, we’ll explore how engineers can leverage LXD for scalable container management, advanced networking, and application isolation.
If you’re following this tutorial series, subscribe to get more guides and examples right in your inbox.
This version keeps all the original content’s functionality while improving readability and flow for readers who want to learn hands on Linux container management.